Hello! I just wanted to leave a notice quick, I'm moving to Wordpress!
Come follow me there, urbansugartree.wordpress.com
Much love, bye bye, Blogger.
Friday, May 16, 2014
Monday, May 12, 2014
Super Easy (and practically FREE) DIY Cocktail Shaker.... And Perfectly Simple Summer Margarita Recipe, With Printable!
 Now, as you've probably noticed if you've been around here much, we're not really the most...upscale of all people. We're more likely to grab a beer or pour some rum in our coke than to whip up some fancy-smancy cocktails. So a cocktail shaker is not something we've ever even looked into buying....until I discovered this perfect margarita recipe! It's so easy - especially when compared to getting out the blender, remembering to buy more frozen strawberries, crushing ice, trying to guess how much tequila to triple sec you should use, and making a new batch of simple syrup each time! All you need to do is pour in 3 ingredients and shake it up. So, I started looking around for a real shaker then, and while I know it's probably not that big of a deal to find one somewhere, and they're probable not that expensive, they seemed like it to me at the time. I think I like what I came up with just fine! So instead of dropping thirty bucks on another gadget to clutter my kitchen, I reused something I already had, and as a bonus, saved it from being tossed into the recycling bin. That's something that always makes me happy!
Check it out!!

It was so easy. Step one, polish off a jar of queso. (thanks Hunny!)
Step two, peel off the label and scrub clean. Something abrasive like Comet or baking soda helps with this part.
Step three, take your lid(s, I did two!) outside and give them a couple coats of spray paint! I did red and teal cause that matches my kitchen :) Let them dry at least overnight. I wasn't sure how the paint would do in contact with liquid, especially liquid I was going to be drinking, so I let mine dry two days I think. So far it's been excellent.
Step four - Make a margarita!!
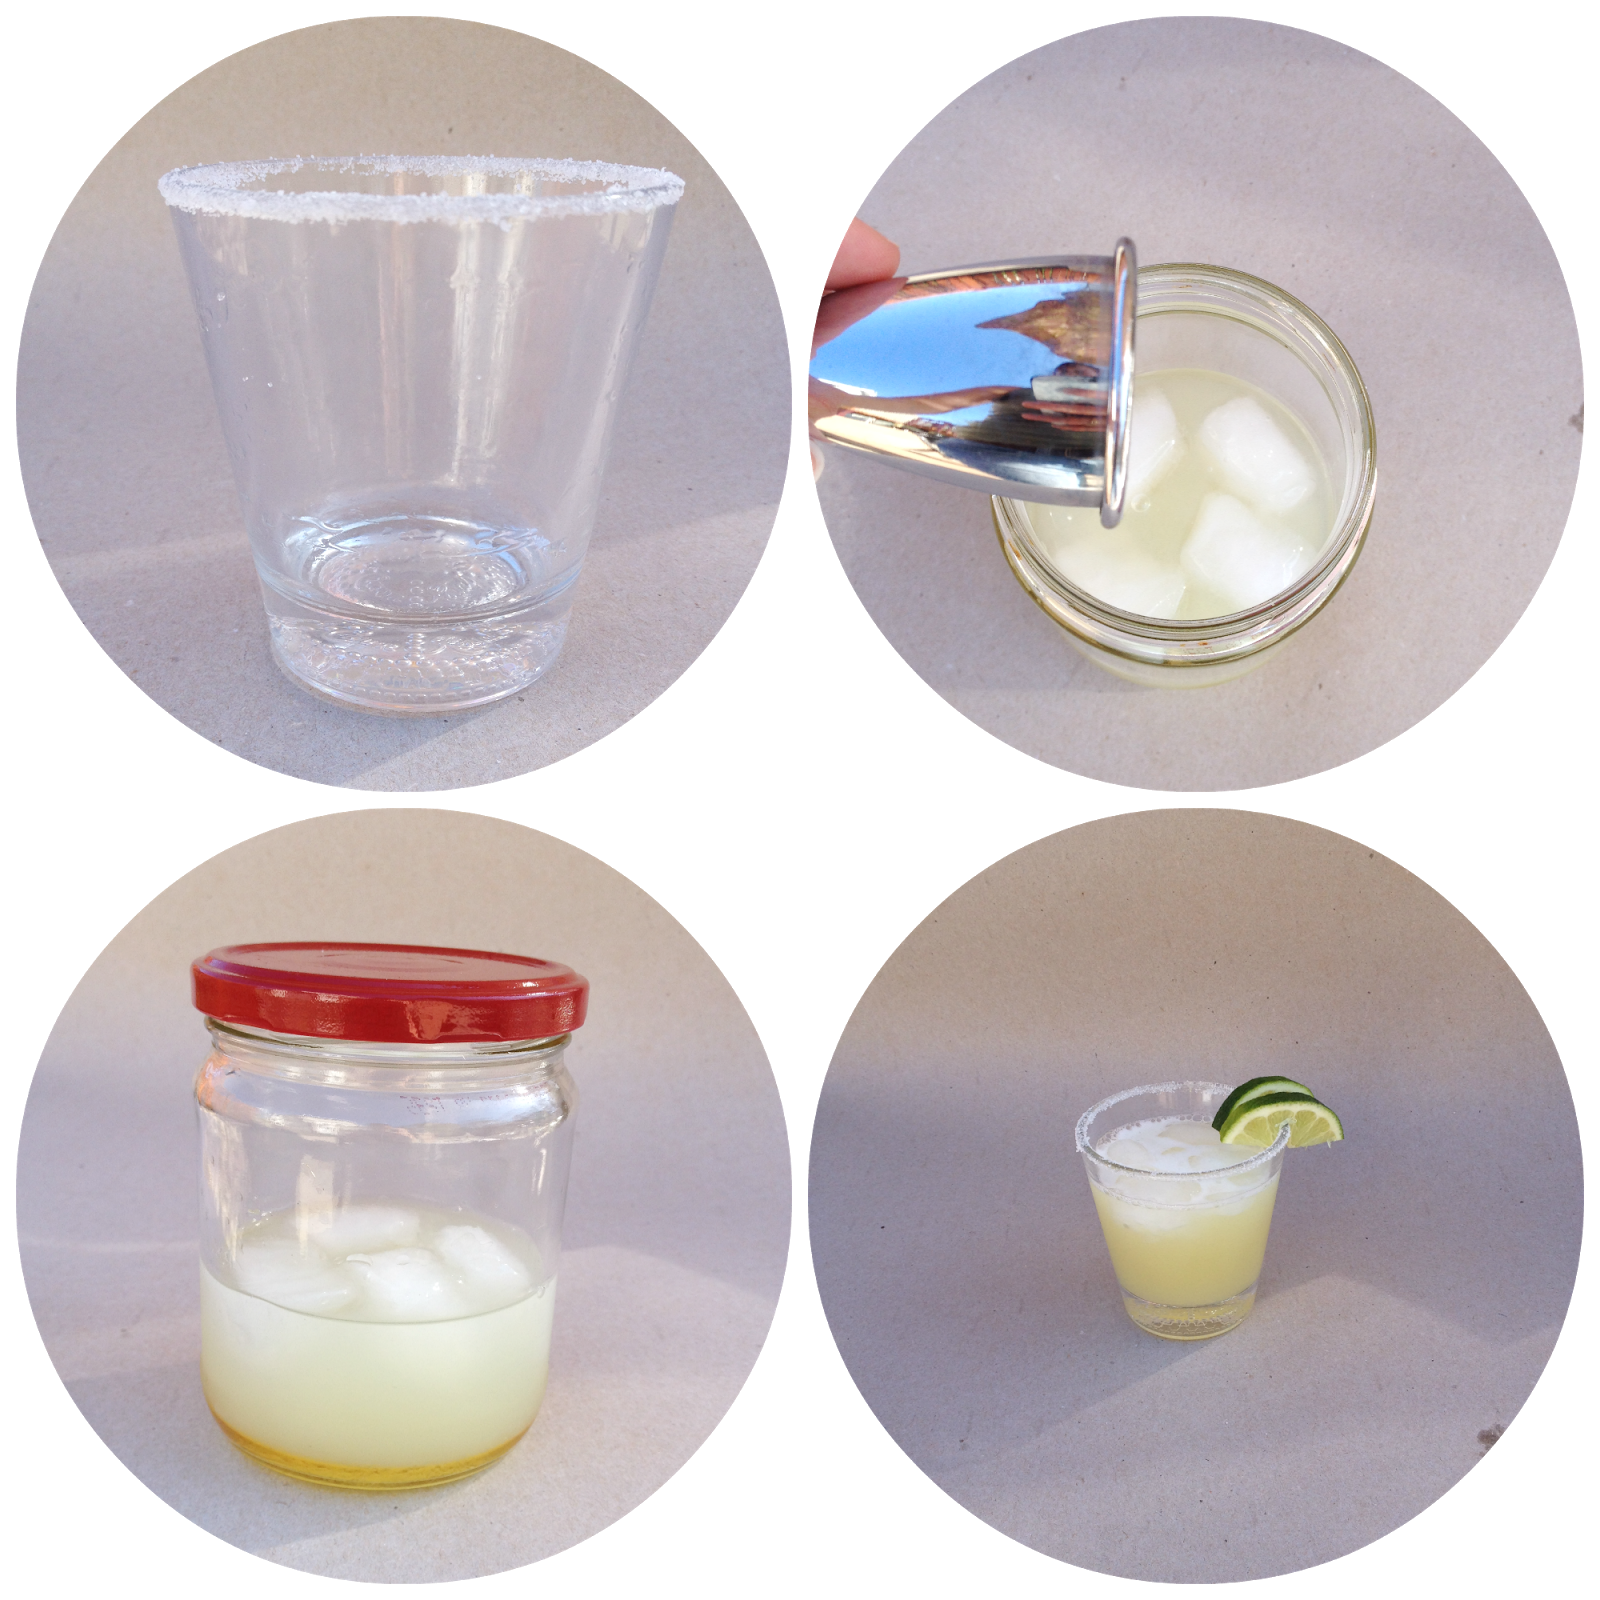

As I gathered up everything for this and took it outside for photos, I couldn't help but think what a fun gift this would be!! Print out a few different margarita or tequila recipes on card stock, tuck it all in a basket, and ta-da! Hostess gift? Happy summer gift? Who needs a reason! Anyone would love it :)

Tuesday, April 29, 2014
Spring Furniture Redos!
I've got this little idea in my head that maybe the reason I don't blog as much as I should is because when I do, I over-do. I know I tend to be the person who overcomplicates things in general anyway, so maybe I've carried that over to blog-land. So I'm gonna try and keep this one nice and simple! Short and sweet! Less is more!
I wanted to share a couple pretty cute furniture redo's I finished a while back, when we had a short break between snowstorms and April showers. It was so nice to be outside! I even got to don a tshirt for a little bit. We had a few days where we got into the high 60's, but I don't think we ever reached the ideal 'sunny and 75!' Now we're stuck inside again. High's barely above freezing, and rain mixed with snow. For like 3 days!! Ughhhh. Talk about California dreamin'......
Anyway! I'm doing it again, aren't I? too much talky talk. Down to business!
Here's my first victim.... Mwahahaha

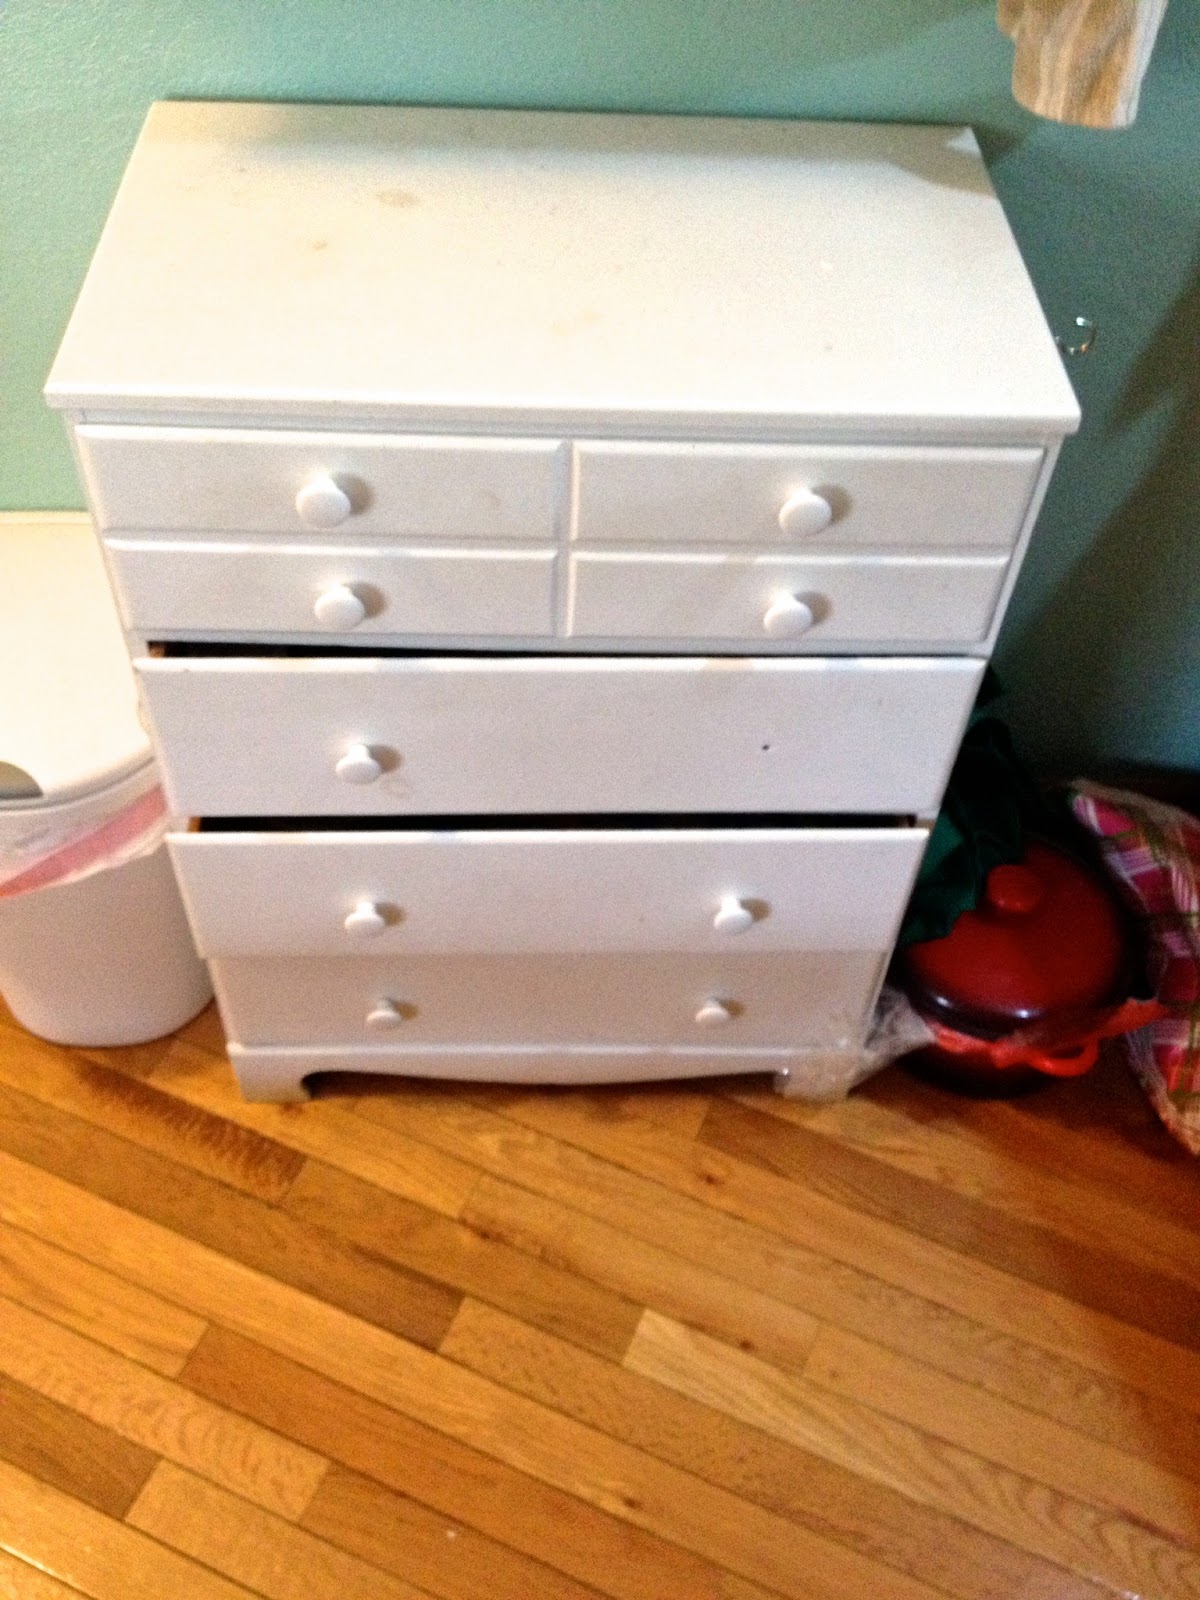
Previously it was in my bedroom housing a fair amount of clothing.. But when we moved to our current apartment, there was a ton of storage room in our bathroom and when all those clothes got relocated, this little dresser came to live in the kitchen! It's great for holding all that mismatched tupperware, saved spaghetti jars that I just know have a new life coming, and a bunch of other stuff. It's actually my spice cabinet right now too!
I really wanted to use chalk paint, but 1) I was too inpatient to order online, and 2) I probably wouldn't have spent the money on it right now anyway. But I had read about making your own using Plaster Of Paris, which I just happened to have an old box of! Yay!


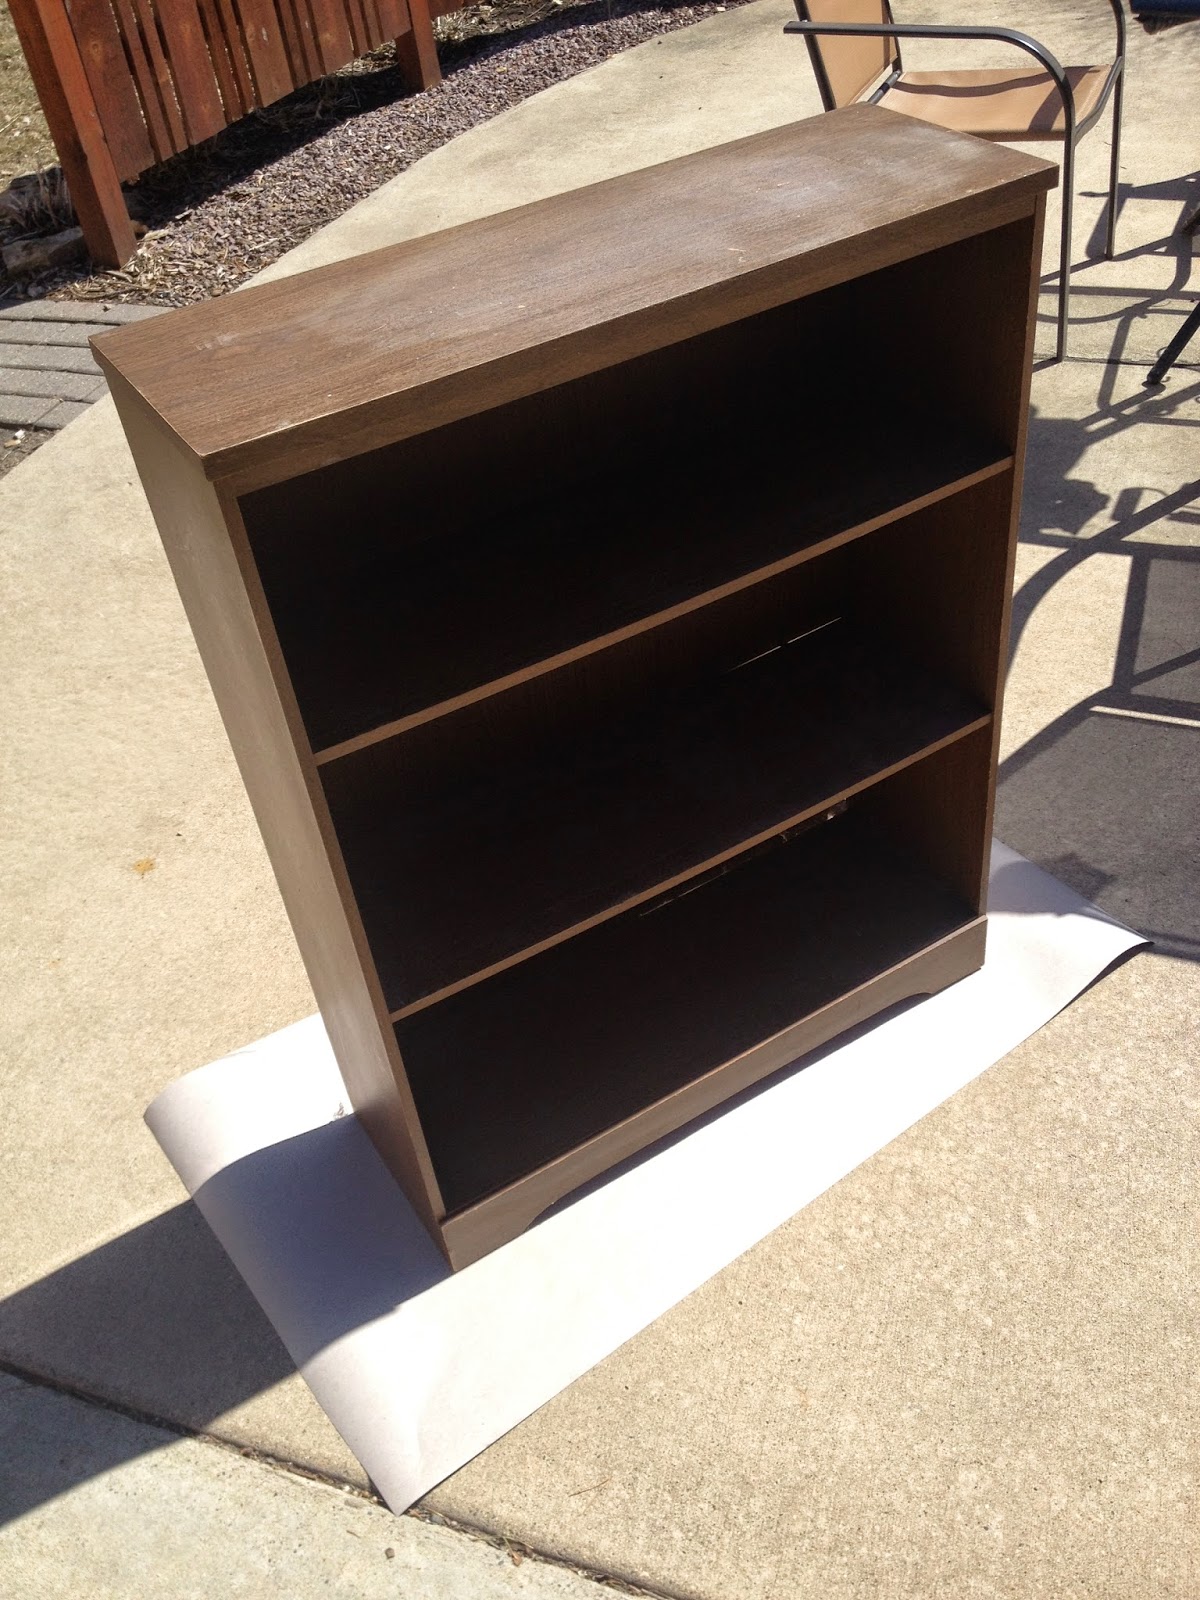
Just a homely little bookshelf that I picked up off the curb when our neighbors moved out last summer. It's made a great entry-way storage solution, storing bags, purses, shoes, tools, and, I've made great space saving use of the top as my ironing board lately!
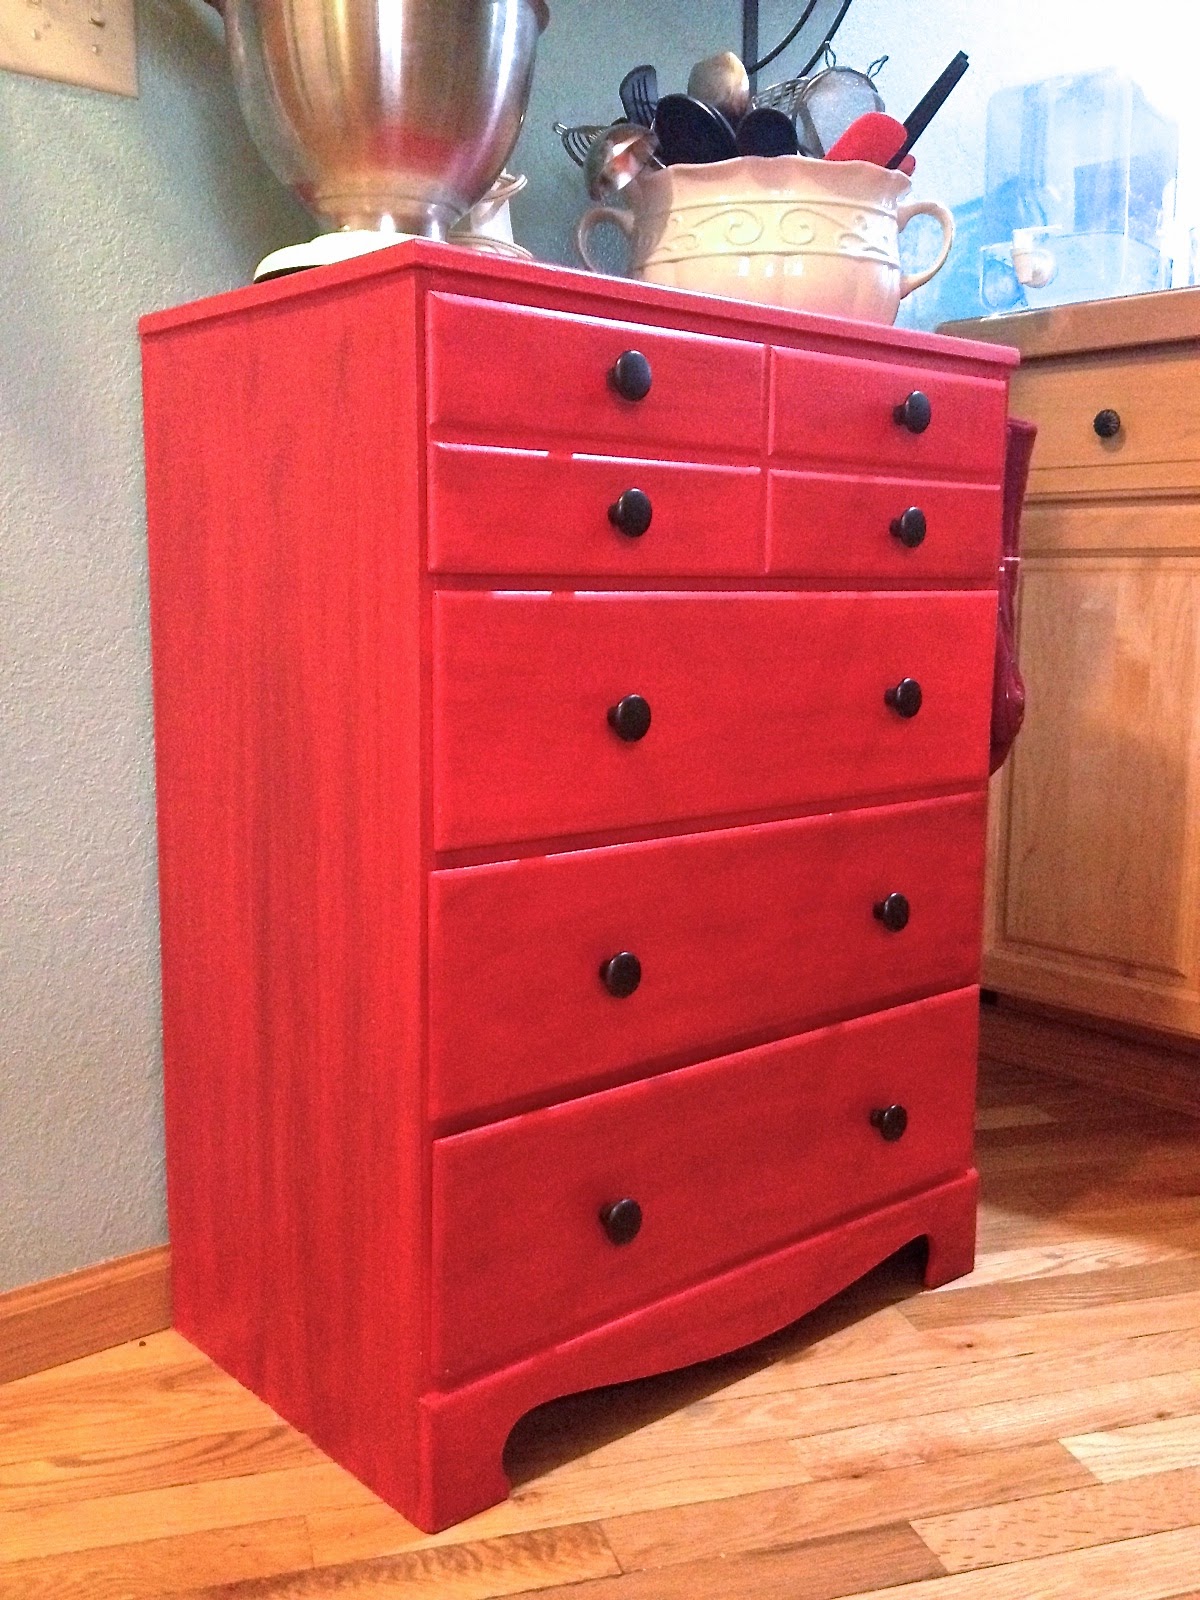
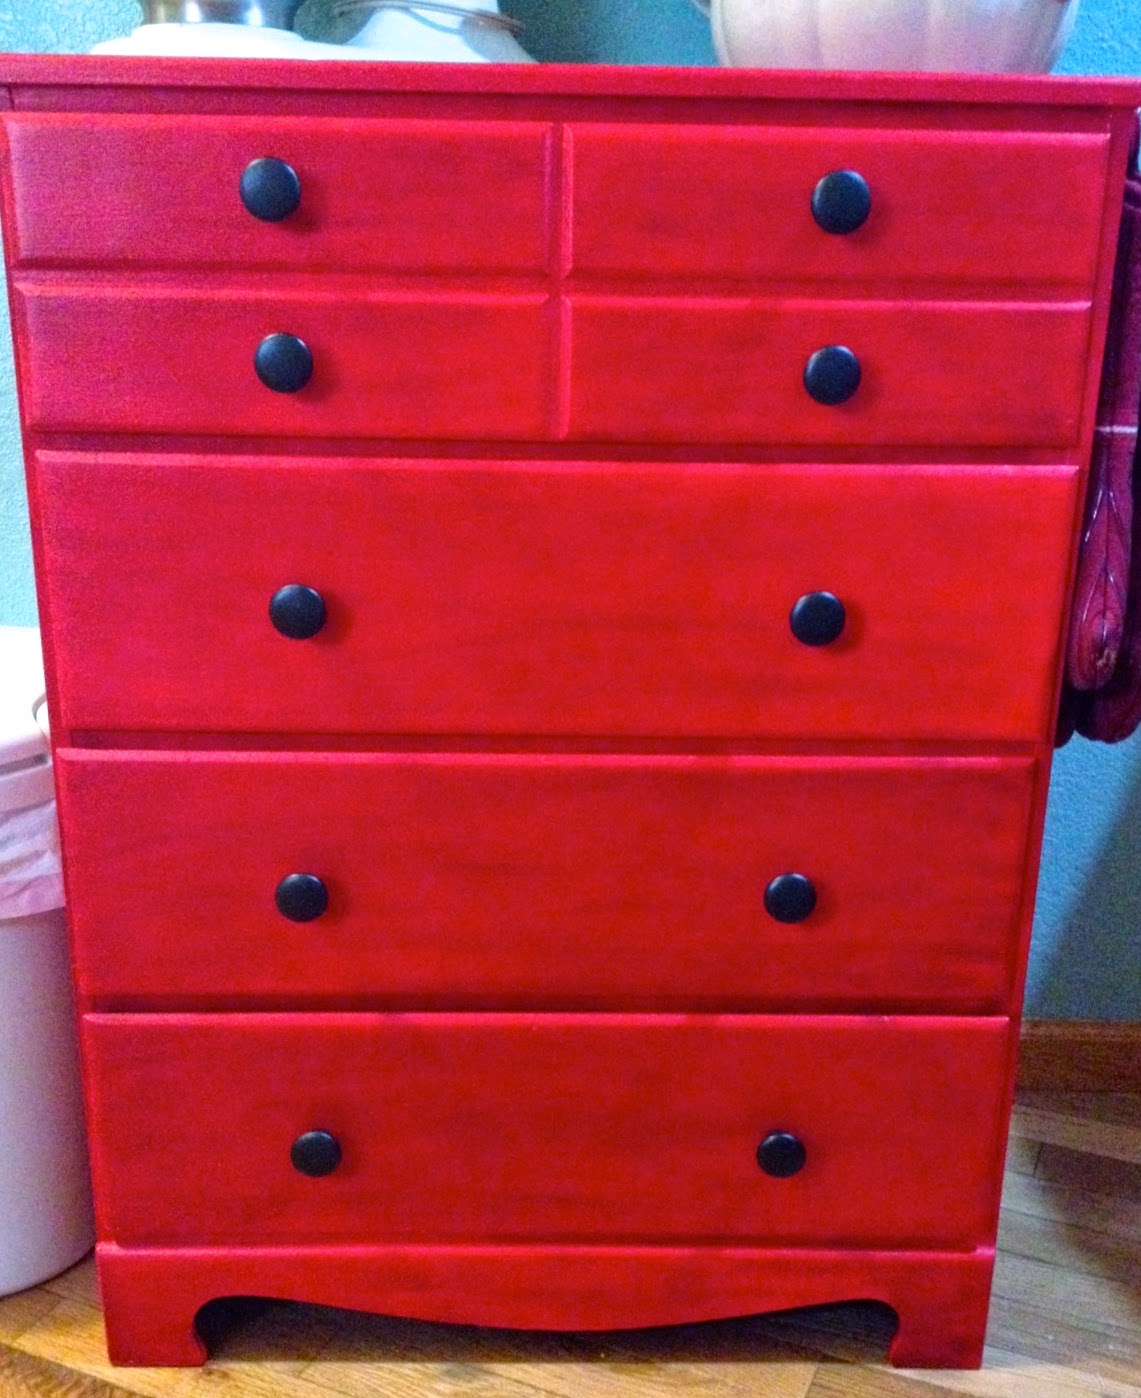
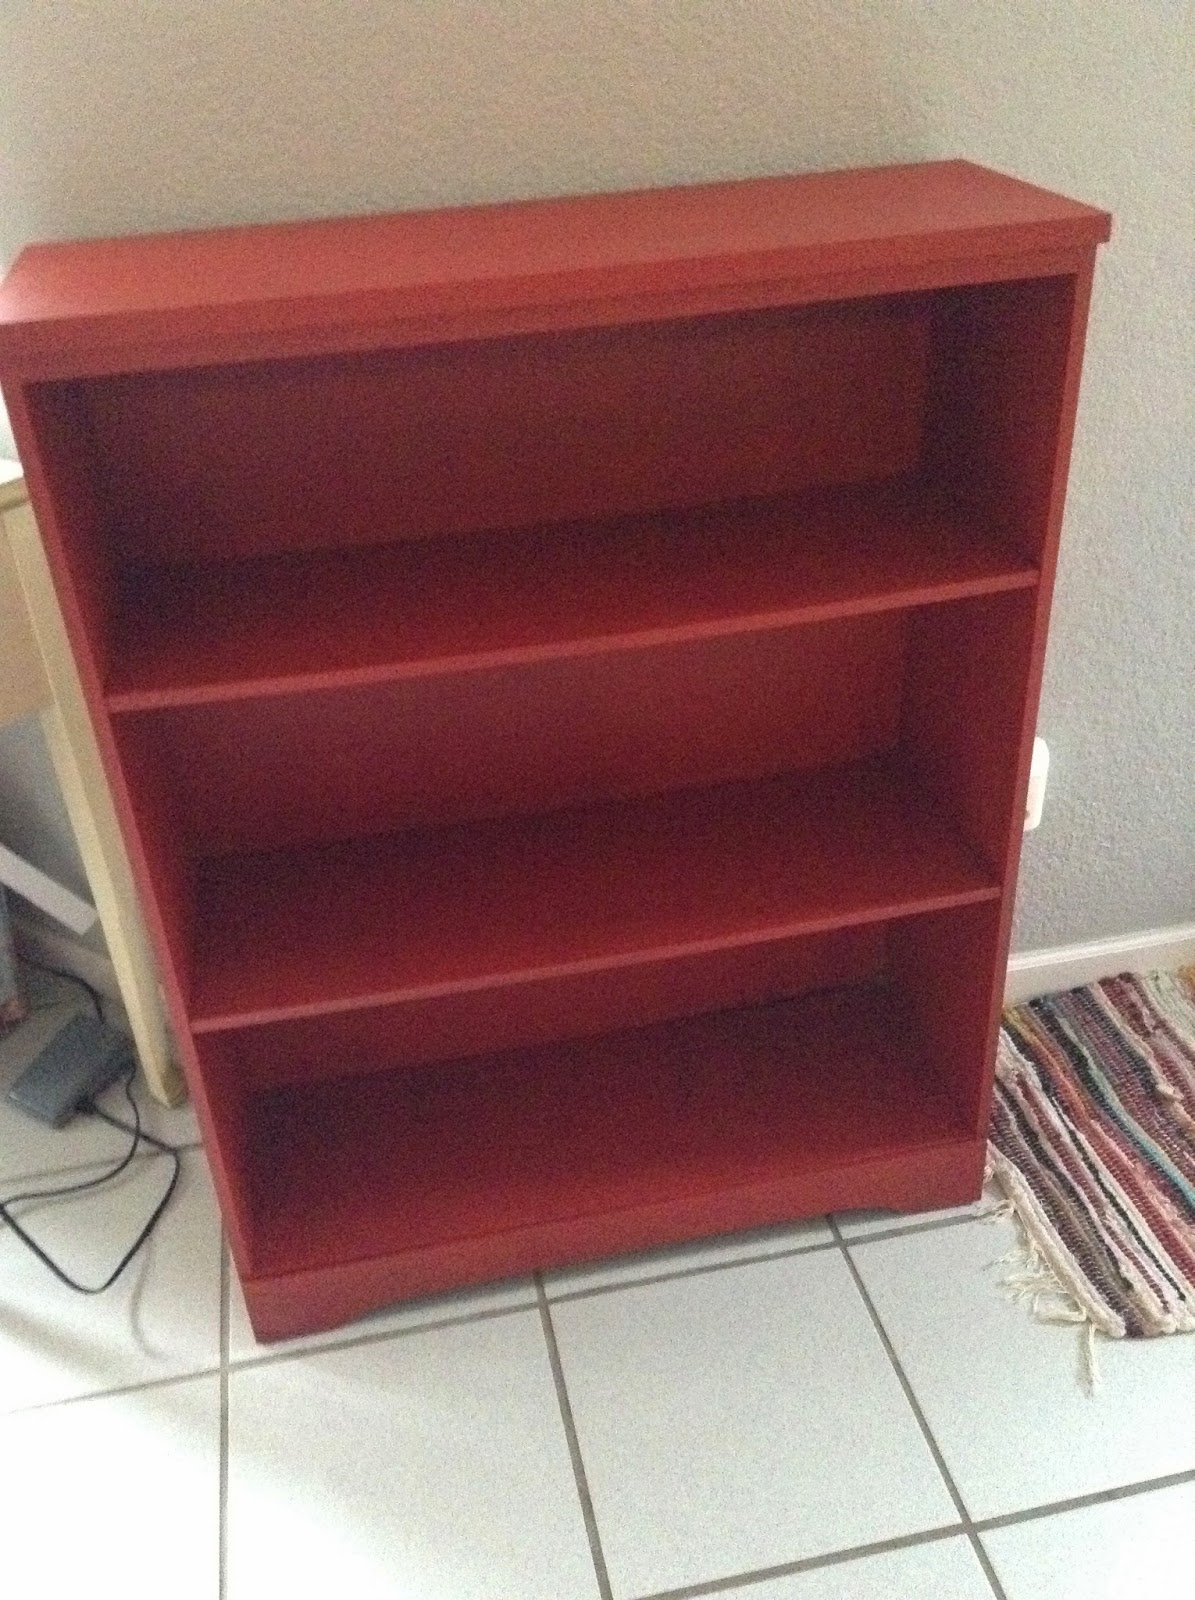
I used the same paint, except I added a few drops of my black paint before I used it this time - it made the perfect color when finished - without all the extra work (and slight streakiness) of the whole color wash ordeal! (Not that I'm complaining, it was pretty fun :) I did three coats, some light sanding, and a couple layers of wax, and ta-da again!

Not the best pictures, but you get the idea. It's pretty, functional, and really durable! I've slid some heavy wooden boxes around on the bottom shelf, and it hasn't scratched or rubbed the paint off at all! Woot woot! :)
Thanks for checking it out!
I wanted to share a couple pretty cute furniture redo's I finished a while back, when we had a short break between snowstorms and April showers. It was so nice to be outside! I even got to don a tshirt for a little bit. We had a few days where we got into the high 60's, but I don't think we ever reached the ideal 'sunny and 75!' Now we're stuck inside again. High's barely above freezing, and rain mixed with snow. For like 3 days!! Ughhhh. Talk about California dreamin'......
Anyway! I'm doing it again, aren't I? too much talky talk. Down to business!
Here's my first victim.... Mwahahaha
Previously it was in my bedroom housing a fair amount of clothing.. But when we moved to our current apartment, there was a ton of storage room in our bathroom and when all those clothes got relocated, this little dresser came to live in the kitchen! It's great for holding all that mismatched tupperware, saved spaghetti jars that I just know have a new life coming, and a bunch of other stuff. It's actually my spice cabinet right now too!
I really wanted to use chalk paint, but 1) I was too inpatient to order online, and 2) I probably wouldn't have spent the money on it right now anyway. But I had read about making your own using Plaster Of Paris, which I just happened to have an old box of! Yay!
Mixed it up, 3 tablespoons to 1 cup of paint, barely sanded my piece, wiped it down for dust, and slapped this on! It dried super fast. I did two coats in less than an hour I think. I did sand just a little bit between coats, but I probably didn't really need to. I let it dry a good 18 hours or so, then decided it was too shiny and orange-y, so I kinda...colorwashed it, I think. I just mixed a drop of black acrylic craft paint with some water and wiped it on with a rag. I kinda just made it up as I went along. I added a couple coats of wax, and ta-da! I think it turned out pretty nice!
I didn't even add new knobs - those are the same ones it had, I just gave them a quick painting with some 'oil rubbed bronze' spray paint and voila! This adds so much storage to my kitchen. I love it!
On to victim number two...
Just a homely little bookshelf that I picked up off the curb when our neighbors moved out last summer. It's made a great entry-way storage solution, storing bags, purses, shoes, tools, and, I've made great space saving use of the top as my ironing board lately!
I used the same paint, except I added a few drops of my black paint before I used it this time - it made the perfect color when finished - without all the extra work (and slight streakiness) of the whole color wash ordeal! (Not that I'm complaining, it was pretty fun :) I did three coats, some light sanding, and a couple layers of wax, and ta-da again!
Not the best pictures, but you get the idea. It's pretty, functional, and really durable! I've slid some heavy wooden boxes around on the bottom shelf, and it hasn't scratched or rubbed the paint off at all! Woot woot! :)
Thanks for checking it out!
Finally Back!
Hello again!
I must apologize for my absence for the past few weeks! I'm so sorry. I have many 'reasons' but I'm sure if I started listing them they would sound much more like 'excuses,' so, what it really boils down to isbeing unmotivated laziness. Sure, I've been busy doing other things, but if I weren't so lazy after those things, we would have had blog posts every day!
So what have I been up to? Well I've been sewing a little, painting some furniture, sorting through my closet in an attempt to simplify my wardrobe, working of course, and, drumroll please.... I finally worked out a bill payment/income/savings system that WORKS! I love it!!
Easy Two Page Month at a Glance Budget
And speaking of trial and error - I hope this works for you to download! This is my first time sharing a document on blogger (or any online platform, lets be honest!) so I hope I've done it right. You'd think an hour of googling would pay off... Ha ha
Why is this the perfect system for us?
First off, I wanted to keep better track of exactly how much we're making. With my house cleaning work, there are many variables, so even when I estimate what I should have coming in, sometimes someone is sick, or on vacation, or has extra cleaning or organizing to be done, so my income changes up or down accordingly. I wanted to be able to see exactly where we had extra income, and exactly where that money was being spent. So at the beginning of the month, I look at my work schedule and fill in the Expected Income box. Then I record every check I deposit, as well as any (however small) etsy sales (cause that's not takin' off yet!) on the Income Ledger portion below, and keep a running total on the far right. That way, at the end of the month, it's super simple to copy all income into the Actual Income box back at the top.
As for the bills section, I listed them in order that they are generally due, but because the due date and amount changes on some, I left those columns blank so I can write in the specific date and amount when I get the statement, either in the mail or online. I also left enough room in the Paid column to record payment confirmation numbers if needed.
I didn't include credit cards in the regular bill lineup, mainly because I had a different format in mind. I wanted to clearly see our progress in paying them off, so I needed room for starting balance, recording payments, and more than one a month, if possible (I try to send some of that extra income here) and of course the ending balance. I did include a section for new charges, although with the goal of paying all our debt off, it's not a category I plan on using unless there is an emergency. (and no, ice cream and beer do not count as emergency purchases! Ha ha)
As for the Spending Ledger.....I have to admit, it's a category I've got mixed feelings about. I did want to try the cash envelope system, but my husband wasn't as enthusiastic as I was, so I came up with this. And I have to say, the thought of saving all receipts and copying them down when I get home does discourage impulse buying!! And we can see exactly what we're wasting money on, assess what we need to change, and do it!
So that's why I love my new system! Hopefully it works for you too, or at the very least inspires you to find what does. Thanks for stopping by!
I must apologize for my absence for the past few weeks! I'm so sorry. I have many 'reasons' but I'm sure if I started listing them they would sound much more like 'excuses,' so, what it really boils down to is
So what have I been up to? Well I've been sewing a little, painting some furniture, sorting through my closet in an attempt to simplify my wardrobe, working of course, and, drumroll please.... I finally worked out a bill payment/income/savings system that WORKS! I love it!!
I've tried other people's methods and systems and printables before, but nothing ever seemed to work just right for us. So far the best system I had going was tacking the paper bills to a bulletin board in the order they were due. Which was logical... except for all the bills that we don't get paper statement for! We had a couple set up to auto-pay, and the rest we just tried our best to remember. Not exactly fail proof. So when I came across a link to this printable on Thirty Handmade Days, I was excited. 'Maybe this is the one' I thought to myself, Ted Mosby style. (Side note, I've been on a HIMYM binge lately too) So I printed 'er out and started penciling it in. Only to find, sadly, that it was not perfect for me :( wah wah wah. While it is awesome for a TON of people, it just didn't work quite right for our needs. I loved the idea that it was on on one page in a simple, easy summary, but I realized I needed just a little more detail on mine. I also love the spending records in the packet, but wanted to see if I could incorporate them both into a one-sheet deal. I couldn't. But I do love what I came up with... after several trial and errors - Check it out!
Easy Two Page Month at a Glance Budget
And speaking of trial and error - I hope this works for you to download! This is my first time sharing a document on blogger (or any online platform, lets be honest!) so I hope I've done it right. You'd think an hour of googling would pay off... Ha ha
Why is this the perfect system for us?
First off, I wanted to keep better track of exactly how much we're making. With my house cleaning work, there are many variables, so even when I estimate what I should have coming in, sometimes someone is sick, or on vacation, or has extra cleaning or organizing to be done, so my income changes up or down accordingly. I wanted to be able to see exactly where we had extra income, and exactly where that money was being spent. So at the beginning of the month, I look at my work schedule and fill in the Expected Income box. Then I record every check I deposit, as well as any (however small) etsy sales (cause that's not takin' off yet!) on the Income Ledger portion below, and keep a running total on the far right. That way, at the end of the month, it's super simple to copy all income into the Actual Income box back at the top.
As for the bills section, I listed them in order that they are generally due, but because the due date and amount changes on some, I left those columns blank so I can write in the specific date and amount when I get the statement, either in the mail or online. I also left enough room in the Paid column to record payment confirmation numbers if needed.
I didn't include credit cards in the regular bill lineup, mainly because I had a different format in mind. I wanted to clearly see our progress in paying them off, so I needed room for starting balance, recording payments, and more than one a month, if possible (I try to send some of that extra income here) and of course the ending balance. I did include a section for new charges, although with the goal of paying all our debt off, it's not a category I plan on using unless there is an emergency. (and no, ice cream and beer do not count as emergency purchases! Ha ha)
As for the Spending Ledger.....I have to admit, it's a category I've got mixed feelings about. I did want to try the cash envelope system, but my husband wasn't as enthusiastic as I was, so I came up with this. And I have to say, the thought of saving all receipts and copying them down when I get home does discourage impulse buying!! And we can see exactly what we're wasting money on, assess what we need to change, and do it!
So that's why I love my new system! Hopefully it works for you too, or at the very least inspires you to find what does. Thanks for stopping by!
Thursday, March 27, 2014
The printable bread recipe
No work today!! Yay! So I had big plans for
a) sleeping in till 8, and
b) completing several errands and projects - projects I was really excited about!!
Sadly, the day didn't go as I had hoped :(
It was off on the wrong foot way before the start... Woke up at 5 am (thanks to the nonsensical meowing cat) and had a splitting headache. We wrangled the cat back to silence, and then I sent myself back to sleep, hoping I would wake up in 3 hours headache free and project ready! That didn't turn out to be the case though, I've been fighting with this stupid thing all day now. PMS SUCKS! So to save this day from being a total waste, I wanted to at least get this recipe on here for the people. :)
Sourdough Starter and Bread
First Time (omit if you received a starter from someone else)
1 cup warm water
1/2 cup sugar
3 Tbsp instant potato flakes
2 1/4 tsp. dry yeast
Mix well in large bowl, cover loosly, allow to ferment on counter for 2 days. After 2 days, you can choose to immediately continue with feeding and bread making process, or refrigerate in coverd glass jar 3-5 days.
Subsequent feeding
1/2 cup sugar
3 Tbsp. Instant potato flakes
1 cup warm water
Add sugar, potatoes, and 1/2 cup water to large bowl and mix well. Pour in starter, use remaining 1/2 cup water to loosen and rinse any settled sugar/potatoes from jar. Mix slightly. Cover loosly and let stand on counter 8-12 hours. Stir mixture and measure out 1 cup to make bread. Return remaining starter to refrigerator. Repeat this process every 3-5 days. If not making bread, give away or throw out 1 cup of the mixture before refrigerating. Do not go longer than 5 days without feeding.
To make bread
1 cup starter
1/4 cup sugar
1 tsp. salt
1/2 cup vegetable oil
1/12 cups warm water
6-7 cups flour (feel free to experiment with flour ratios)
Mix first 5 ingredients in large bowl. Add flour 1-2 cups at a time. Amount needed will vary, depending on humidity, etc. Incorporate as much as you can, leaving your dough tacky, but not sticky. Pat top with oil, or spray with cooking spray. Cover loosly and let rise 8-12 hours.
Punch dough down, turn onto floured surface and knead briefly. Divide into 3 parts, and place in oiled loaf pans. Pat tops with oil, or spray with cooking spray. Cover with waxed paper and let rise 4-6 hours, until dough almost doubles.
Preheat oven to 350. Bake loaves for 30-40 minutes, until golden. Remove from pans and brush tops with melted butter. Be cautious of the steam if you cut into it right away!!
*Just a note on the scheduling. I've found that it works well to feed the starter in the morning, make the dough in the evening, decide into loaves the following morning, and bake in the early afternoon. That saves you from being stuck baking bread at 2 am. Unless you're normally up then, in which case, go for it!
So that's it!! I'm sure it sounds complicated, but trust me, it's simple once you get the hang of it. The most hands on part of is adding the flour to make the dough, and that only takes maybe 15 minutes!
Let me know how yours turn out!! :)
Tuesday, March 25, 2014
The Secret Sourdough Recipe (and method (and tips and tricks))
 |
| (Excuse the messy looking pans... let's just say they're, vintage.) |
Are you as excited about this post as I am?! Today you get to find out how to make my Mom's legendary sourdough bread!! I can't wait to share it :) It's super simple and really fun. I remember how much we enjoyed helping Mom make it when we were kids - so I'm sure if you have little ones they'll love helping out.

So where do you start? If you're like me and had no one to share a starter with you...you do this.
(Or, if you live in the greater Twin Cities area, give me a call and I'll set ya up. ;)
 |
| Yes, this stuff, the out-of-the-pantry-for- emergencies-only potato flakes, in bread. Trust me. |
Otherwise, here is the recipe for the starter. (from Just a Pinch)
1 cup warm water (I make it pretty hot - our hottest tap water)
1/2 cup sugar
3 tablespoons instant potato flakes
1 pkg. (2 1/4 tsp.) dry yeast
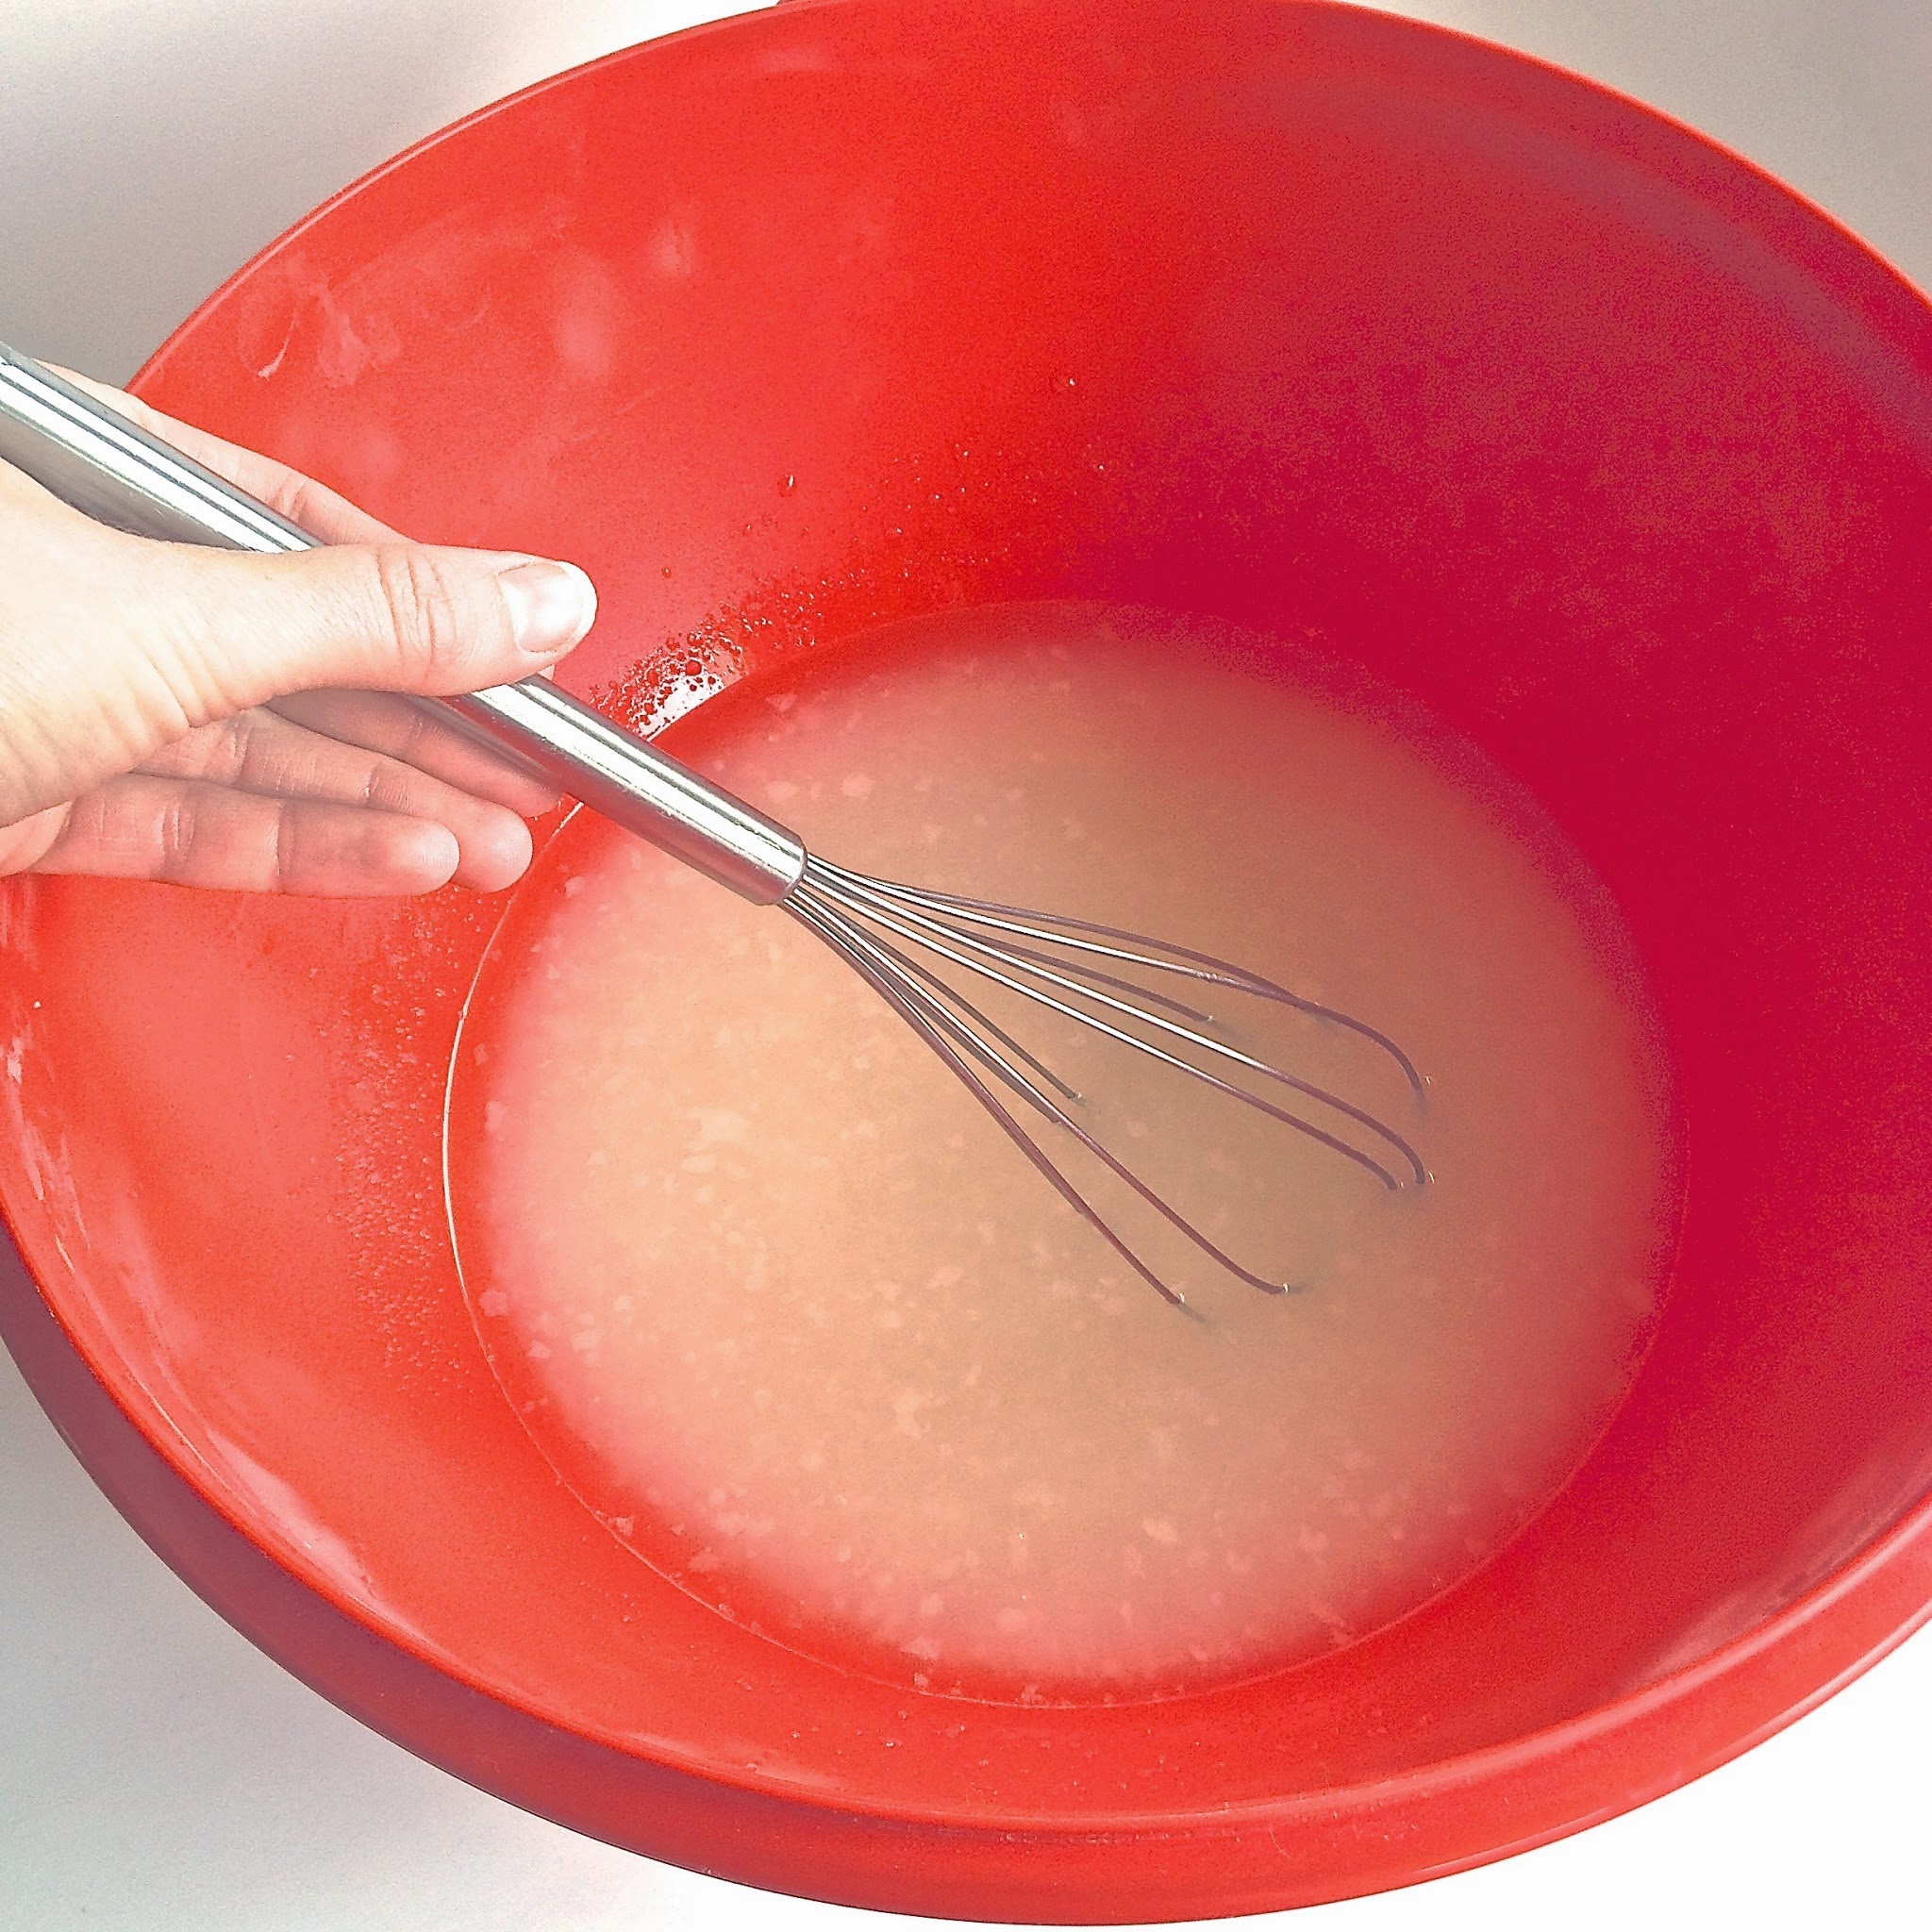
Mix together in large mixing bowl. I use this beauty...
(Yay, tupperware wedding gifts!)

I just sat the lid to my bowl on, without sealing it. You can also use a clean dish towel or wax paper.
After two days, it will be bubbly and foaming and wonderfully fermented smelling. Now...
mix together:

1 cup warm water (again, hot is fine)
3 tablespoons instant potato flakes
Mix well and add to starter, then mix slightly.
It should look somewhat like this stuff...
Now let that sit out, covered loosely, another 8-12 hours. You're almost ready to make bread!
After the 8-12 hours, stir, measure out 1 cup for making bread, and pour the rest in a glass jar and store in the fridge. Like so...

Now you get to make the actual bread! Take your 1 cup of starter, and put it back in your bowl.
Add
1/4 cup sugar
1 teaspoon salt
1/2 cup oil (canola, vegetable, EEVO, anything tasteless)
1 1/2 cups warm (hot tap) water
6-7 cups flour
I usually start with 1 cup wheat, then add 5-6 cups all-purpose or bread flour. Feel free to mix it up and give different ones a try. Never know what you might find that works great - just make sure you come back and tell me!
Mix all ingredients in your big bowl. I use a whisk, a wooden spoon, and sometimes my (clean) hands!

Once your flour is incorporated, (you want your dough tacky, but not sticky)

pat top with oil or spray with non-stick cooking spray. Cover (again) and let rise 8-12 hours.
This is what it'll look like.

Punch it down and squish out as much air as you can. Am I the only one who thinks this is like, the funnest thing ever? Pure joy here guys. Call me crazy.

Ok so now you want to divide it into three loaves, and put in greased loaf pans, like so...


It doesn't matter if they're not perfectly evenly divided. Or even if you don't have loaf pans. Bread tastes great no matter what shape it's in. :)


Oil tops, cover, and raise another 4-6 hours. Once your loaves look nice and rounded up, preheat oven to 350 degrees. Bake loaves for 30-40 minutes, until golden. If I'm doubting doneness, I use the upside down trick... Pop a loaf out of the pan, and if a tap on the bottom sounds hollow, it's done!
Remove from pans and brush tops with melted butter. (Try to) let cool a couple minutes before you devour it! I hope you like it!!
I'll post the printable recipe tomorrow... it's really a lot easier than it sounds. Anyway, it's past my bedtime right now! Thanks everyone :)

Monday, March 24, 2014
My favorite photos
Since I'm new here, I wanted to dig back in my personal archives and share a few of my favorite photos from the past year or so. I hope you enjoy them :) I'd love to hear any comments or feedback to know whatcha'll are thinking!


 |
| Our baby girl Zadee |
 |
| A rare sunrise I was awake for |
 |
| The only good thing about an ice storm... |
Lastly, I thought the colors in these two went together well
Mom's Sourdough Bread, Part 1


I think my oldest memories of this bread goes back to my childhood, circa 1997... Peachtree Drive, a little house outside Atlanta, Georgia, visiting my Aunt. She would make this bread, then in the mornings we would have it toasted, slathered with butter, with farm fresh eggs, sunny side up. Mmm! Still a favorite of mine!

For years after that my mom would make it, off and on. We almost always knew someone else who had a starter to share, in the cases where something happened and her started died, or she decided to take a break from making it and threw her starter out. It was always pretty easy to get another one.
Enter present day - Mom doesn't have the starter. I live 500 miles away from anyone else I know of who might have it. And I have a craving for that familiar soft, warm, buttery deliciousness. So what else am I gonna do than try and make it myself? I mean, what's a girl to do? I dug out my copy of her instructions and started meditating...

If that's all it takes to feed the starter, maybe that's all the starter really is. Fermented sugar, water, and potato flakes. So I mixed them together excitedly, let it sit on the counter a full 12 hours, and continued on with the recipe! I WAS GONNA HAVE THE SOURDOUGH BREAD!!
About 32 hours after I started, I ended up.... with a soggy lump of flat dough, and a heart full of disappointment.
It didn't keep me down though, no ma'am, I am more determined than that! After some intensive internet searching, (ok, it was actually really easy to find) I discovered the secret! I found it here. Her recipe is really close to my mom's, just with the additional info - you have to 'start' the starter with yeast! Makes perfect sense, right?
So I did it all over again, this time making the addition of 2 1/4 teaspoons yeast. I let it sit out for two days this time, then refrigerated it for another three days before feeding, splitting, and making the bread. But boy was it worth the wait!
Come back tomorrow for the whole recipe and the rest of my process!
Sunday, March 23, 2014
Hello, Hola, and Bonjour
We've all heard 'honesty is the best policy,' right?
Well, in vein with trying to live life honestly, I will honestly tell you, this is my first ever blog post. Woah. So why am I here? Well, I have my fingers in several (figurative) pies...
I've always loved writing. Seriously, since I was like, 10 years old. It's been an under-developed hobby for years. Along with that, some people think I'm funny. I do believe laughter is the best medicine, and I hope I can give y'all a laugh or two.
I love cooking, baking, trying new recipes (Pinterest, anyone?) and, occasionally, setting off the smoke alarm. Occasionally.
Crafting has been a huge part of my life. I love me some DIY projects, be it scrapbooking, card making, furniture painting, or designing and decorating on a dime. Also, I have recently started to take sewing more seriously. I even have a snazzy little Etsy shop!
I'm also trying to become better at photography. Maybe it's because I refuse to post ugly food pictures on Instagram, or because on Etsy, a photo really does speak a thousand words.
Put all those together, throw in some random kicks and giggles, and I think I'll be able to make a fun blog for the world to see. Hopefully I can bring something tasty, something crafty, or at the very least, a smile, into somebody's day. So here is to, the beginning!

Subscribe to:
Posts (Atom)